Conditional Image Resizing with Photoshop and JavaScript
by Chadwick Wood
November 28th, 2008
Often I find myself having to do a lot of bulk image processing when I'm working on websites: resizing a bunch of pictures to a certain width or height, color adjustments, and sharpening, usually. It can be the most mind-numbing part of my work, and I'm always looking for ways to avoid that.
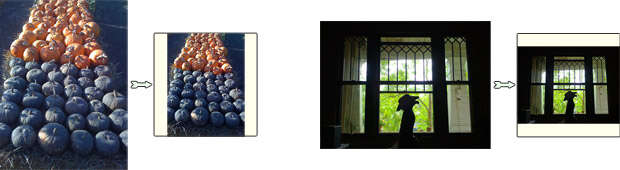
In Photoshop, you can use actions to help you automate a lot of repetitive work. However, the shortcoming I've found with actions is their lack of conditional behavior. For example, let's say I have a big batch of images, some portrait-oriented (taller than they are wide) and some landscape-oriented (vice versa), and I want to resize each of them to fit within a 500 x 500 pixel square. If the image is portrait-oriented, then I need to resize proportionally, setting the height to 500 pixels. If it's landscape-oriented, then I should resize proportionally with a 500 pixel width, instead of height. I've never found a good way to do this with a single action. But where actions fail, JavaScript comes to the rescue.

Resizing portrait- and landscape-oriented images to fit within a square space.
About Scripts in Photoshop
Photoshop CS2 provides a way to write scripts in JavaScript (and AppleScript, but I'm not going to cover that here) to automate all kinds of behavior. What follows is a run-through of a basic script for Photoshop CS2 for doing conditional resizing of images, as well as some basic cleanup and export.
First, a brief intro to how to set up a script for Photoshop CS2. Create a file in a text editor called "Image Resize and Export.jsx", and save it in your Photoshop CS2 Presets/Scripts folder. On my mac, that folder is located at /Applications/Photoshop CS2/Presets/Scripts. This file is where we'll be putting the code that follows. For a text editor, you might look and see if you have ExtendScript Toolkit installed. This is a special editing program made by Adobe for scripting Photoshop (and Illustrator, InDesign, etc.). Once you have your script saved in the right folder, you'll be able to select it in Photoshop via a menu by going to File → Scripts → Image Resize and Export. If Photoshop was already open when you first saved the script file, you'll need to restart Photoshop to make the script appear in the Scripts menu.
The Code
So, on to the code. The script we're making here is going to operate on the current document in Photoshop (that is, the one that's selected when we run the script). I like setting a shortcut key for the script once I have it ready (via Edit → Keyboard Shortcuts...), so that all it takes is a single keypress to resize the current image, clean it up, and save it in a web-ready form.
Anyway, let's do the resizing of the image. Here's the code, with comments about what's going on:
// get a reference to the current (active) document and store it in a variable named "doc"
doc = app.activeDocument;

// change the color mode to RGB.  Important for resizing GIFs with indexed colors, to get better results
doc.changeMode(ChangeMode.RGB);

// these are our values for the end result width and height (in pixels) of our image
var fWidth = 500;
var fHeight = 500;

// do the resizing.  if height > width (portrait-mode) resize based on height.  otherwise, resize based on width
if (doc.height > doc.width) {
    doc.resizeImage(null,UnitValue(fHeight,"px"),null,ResampleMethod.BICUBIC);
}
else {
    doc.resizeImage(UnitValue(fWidth,"px"),null,null,ResampleMethod.BICUBIC);
}
So far, this will give us a resized image that fits within a 500-pixel square (change the dimensions in the code to suit your needs). Now that the image is resized, let's apply some auto-contrast, and sharpen the image (often images get a little fuzzy when you reduce their size a good bit):
// call autoContrast and applySharpen on the active layer.
// if we just opened a gif, jpeg, or png, there's only one layer, so it must be the active one
doc.activeLayer.autoContrast();
doc.activeLayer.applySharpen();
Finally, let's export the image as a JPEG, at 70 quality. The file we save will be named based on the original file, with "web-" prepended to the name:
// our web export options
var options = new ExportOptionsSaveForWeb();
options.quality = 70;
options.format = SaveDocumentType.JPEG;
options.optimized = true;

var newName = 'web-'+doc.name+'.jpg';

doc.exportDocument(File(doc.path+'/'+newName),ExportType.SAVEFORWEB,options);
The resized, optimized version of our image is now saved in the same directory as the original file, with "web-" at the beginning of the file name.
The Whole Thing
Here's the script in its entirety, for easy copy and paste:
// get a reference to the current (active) document and store it in a variable named "doc"
doc = app.activeDocument;

// change the color mode to RGB.  Important for resizing GIFs with indexed colors, to get better results
doc.changeMode(ChangeMode.RGB);

// these are our values for the end result width and height (in pixels) of our image
var fWidth = 500;
var fHeight = 500;

// do the resizing.  if height > width (portrait-mode) resize based on height.  otherwise, resize based on width
if (doc.height > doc.width) {
    doc.resizeImage(null,UnitValue(fHeight,"px"),null,ResampleMethod.BICUBIC);
}
else {
    doc.resizeImage(UnitValue(fWidth,"px"),null,null,ResampleMethod.BICUBIC);
}

// call autoContrast and applySharpen on the active layer.
// if we just opened a gif, jpeg, or png, there's only one layer, so it must be the active one
doc.activeLayer.autoContrast();
doc.activeLayer.applySharpen();

// our web export options
var options = new ExportOptionsSaveForWeb();
options.quality = 70;
options.format = SaveDocumentType.JPEG;
options.optimized = true;

var newName = 'web-'+doc.name+'.jpg';

doc.exportDocument(File(doc.path+'/'+newName),ExportType.SAVEFORWEB,options);
Update: Thanks to Hreinsson for pointing out that I was not specifying a unit when resizing images. The script has been updated now to resize in units of pixels!